ACCESSORY FITTING INSTRUCTIONS

JAGUAR

I-PACE

FULL HEIGHT LOADSPACE PARTITION

T4K1160

FITTING INSTRUCTION

WARNING
  • Accessories which are not correctly installed can be dangerous. Read the instructions carefully prior to installation. Comply with instructions at all times. If in doubt, contact your nearest approved retailer.
CAUTION
  • Make sure to protect the vehicle paintwork and trim.
WARNING
  • Please read the instructions carefully to prevent damage to the vehicle headliner system.
  • The full height loadspace partition may get damaged or stuck if the instructions are not followed correctly.
Fitting Instruction
1
NOTE
  • Repeat this step for the other side.
  • Store the blanking caps in the glovebox compartment.

Remove the blanking caps from the headliner receptacle.

2

Lower the second row seats.

3
NOTE
  • This step only applies to vehicles equipped with sliding D-loop anchor points.
  • Repeat this step for the other side.


  1. Move the sliding D-loop anchor points towards the rear of the vehicle.
  2. Remove and discard the loadspace rail retaining bolt.
4
CAUTION
  • Make sure that the bracket is correctly located. The large fixing hole should be towards the rear of the vehicle, as illustrated.
NOTE
  • This step only applies to vehicles equipped with sliding D-loop anchor points.
  • Repeat this step for the other side.

Install supplied bracket (C) with supplied screw (E) to secure.

  • Torque: 24 Nm
5
NOTE
  • This step only applies to vehicles equipped with fixed D-loop anchor points.
  • Repeat this step for the other side.
  • Do not discard.

Remove the front D-loop anchor points.

6
CAUTION
  • Make sure that the bracket is aligned as illustrated.
NOTE
  • This step only applies to vehicles equipped with fixed D-loop anchor points.
  • Repeat this step for the other side.


  1. Install supplied bracket (B) with the supplied screw (E).
    1. Torque: 24 Nm
  2. Install fixed D-loop anchor point to supplied bracket (B).
    1. Torque: 24 Nm
7
NOTE
  • Make sure that the loadspace partition lower brackets are pointing towards the rear of the vehicle. The Jaguar text should be readable from the rear of the vehicle.

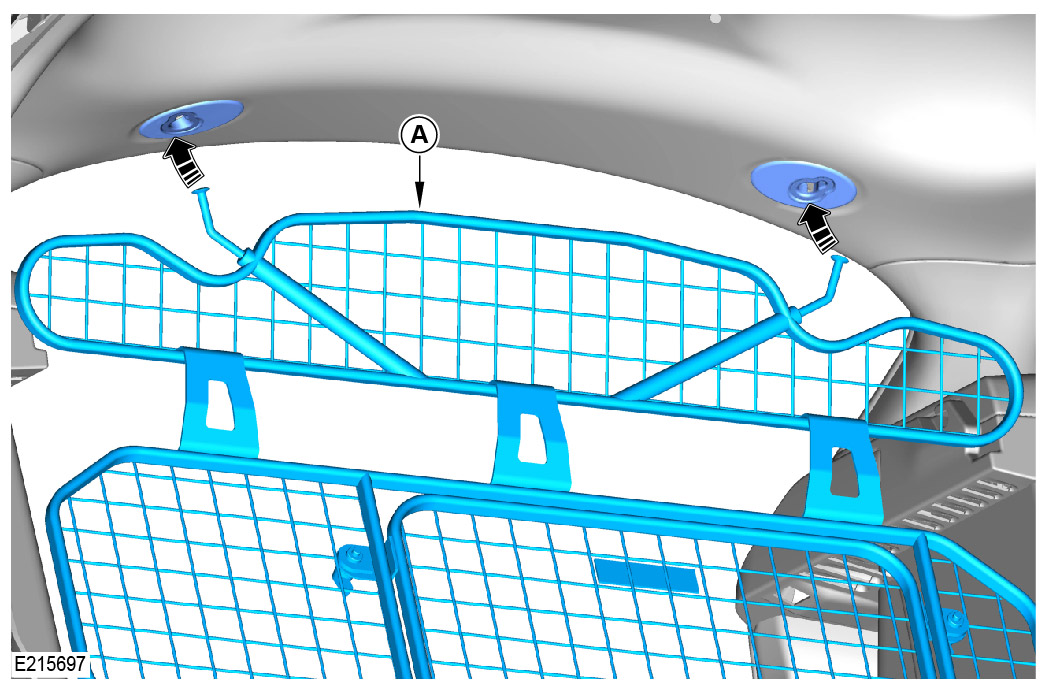
Install the loadspace partition (A) into the vehicle.

8
NOTE
  • The loadspace partition fixing pins may need slight side to side adjustment to fit.

Raise the loadspace partition (A) up into the larger circular slots of the headliner receptacle.

9

Carefully raise both loadspace partition pins through the headliner receptacle brackets.

10
NOTE
  • Raise the seatbelts out of the way.

Move the loadspace partition pins forward into the smaller slots and rest the lower divider brackets on the seat strikers.

11


  1. Install the loadspace partition (A) as illustrated.
  2. Secure both the lower mountings with the supplied thumbscrews (D).
REMOVAL INSTRUCTIONS
1

To remove the loadspace partition follow the sequence below.

2

Lower the second row seats.

3

Remove both thumbscrews from the lower mountings.

4
CAUTION
  • Do not raise the divider pins up fully.

Raise the loadspace partition pins to clear the tabs on the bracket as arrowed.

5
CAUTION
  • Keep the pins only partially raised.

Raise the pins over the tabs and lower the loadspace partition out through the larger circular slots of the headliner receptacle.

6

Carefully remove the loadspace partition (A) from the vehicle.