ACCESSORY FITTING INSTRUCTIONS

JAGUAR

E-PACE

ROOF CROSS BARS - ROOF RAIL FIT

J9C2658

FITTING INSTRUCTION

WARNING
  • Accessories which are not correctly installed can be dangerous. Read the instructions carefully prior to installation. Comply with instructions at all times. If in doubt, contact your nearest approved retailer.
WARNING
  • Comply with all weight limits as illustrated.
CAUTION
  • Make sure the keys (E) and the tools (D) and (F) are kept in a safe place after use. They are required for future removal and installation.
NOTE
  • The roof cross bars have a label at one end. The label has a diagram that illustrates the position on the vehicle where the end of the roof cross bar with the label should be attached. Use the labels to identify the correct roof cross bar for the front and rear of the vehicle. When installing roof cross bars onto the vehicle, use the labels to identify the right and left side of the roof cross bars to make sure they are installed in correct orientation.
  • Labels are on the LEFT SIDE of the rails.
Fitting Instruction
1

Identify the front (A) and the rear (B) roof cross bars. Use the labels on the roof cross bars to assist identification.

2
NOTE
  • Repeat step for roof cross bar (B).
  • Left side illustrations shown, right side is similar.
  • Illustrations show installation and removal of roof cross bar (A), roof cross bar (B) is similar.

Move aside the 2 roof cross bar clamping handle covers on roof cross bar (A) as illustrated.

  1. Using the supplied key (E), unlock the roof cross bar clamping handle cover.
  2. Move the roof cross bar clamping handle cover outwards.
  3. Move the roof cross bar clamping handle cover upwards so the 2 feet are out of the 2 pockets.
  4. Move the roof cross bar clamping handle cover aside as illustrated.
3
NOTE
  • Only complete this step when installing the roof cross bar to the vehicle for the first time.

Install the roof cross bar finishers into roof cross bars (A) and (B) by pushing down along the length of the finisher. Cut the 2 roof cross bar finishers to the required lengths.

4

Lift and pull back the roof cross bar finisher at both ends of roof cross bars (A) and (B). This will allow access to the top fixing bolts at both ends of the roof cross bars.

5
NOTE
  • The front roof cross bar (A) will be installed first.

Identify roof cross bar (A).

6
CAUTION
  • Only complete this step when installing the roof cross bar to the vehicle for the first time.

Using the supplied tool (D), partially loosen the 2 fixing bolts as illustrated.

7

Using the supplied tool (F), partially loosen the fixing bolt as illustrated.

8

Release the clamping handle lock lever by pulling downwards as illustrated.

9

Rotate the clamping handle lock lever upwards to the illustrated position.

10

Repeat installation steps 6 to 9 for the other end of the roof cross bar.

11

Identify the holes on the insides of the roof rails on both the left and right side of the vehicle.

12

Make sure the orientation of roof cross bar (A) is correct in relation to the vehicle. Use the label on the left side of the roof cross bar to assist identification.

13
WARNING
  • This step requires 2 people.

Lift the roof cross bar (A) over the vehicle roof.

14
WARNING
  • This step requires 2 people.
NOTE
  • Repeat this step for the other side of the roof cross bar.

Engage one side of the roof cross bar onto the roof rail as illustrated. Make sure the dowel in the foot of the roof cross bar engages into the hole on the inside of the roof rail.

15
NOTE
  • Repeat this step for the other side of the roof cross bar.

Clamp the roof cross bar to the roof rail on one side of the vehicle.

  1. Pull the roof cross bar clamping handle downwards as far as it will go. This will also move the clamping handle lock lever.
  2. Return the roof cross bar clamping handle to the upright position. The clamping handle lock lever will remain in position.
  3. Lock the roof cross bar clamping handle by pushing the clamping handle lock lever upwards.
16
CAUTION
  • Only complete this step when installing the roof cross bar to the vehicle for the first time.

Using the supplied tool (D), tighten the 2 illustrated fixing bolts to the correct torque. Complete step on both ends of the roof cross bar. Refer to steps below to assist.

  1. Partially tighten the 2 fixing bolts at the top of the left side of the roof cross bar.
  2. Tighten the 2 fixing bolts at the top of the right side of the roof cross bar to the required torque.
  3. Return to the left side and complete the tightening of the 2 fixing bolts to the required torque.
  4. Torque: 9 Nm
17

Push down the roof cross bar finisher at both ends of the roof cross bar.

18
CAUTION
  • Only complete this step when installing the roof cross bar to the vehicle for the first time.
NOTE
  • Repeat this step for the other side of the roof cross bar.

Using the supplied tool (F), tighten the illustrated fixing bolt to the correct torque on one side of the roof cross bar. Listen for an audible click to indicate the required torque has been reached. This will secure the clamping handle in position.

  • Torque: 2 Nm
19
NOTE
  • Repeat this step for the other side of the roof cross bar.

Replace the roof cross bar clamping handle cover on one side of the vehicle.

  1. Lower the roof cross bar clamping handle cover and engage the 2 feet into the 2 pockets as illustrated.
  2. Push the roof cross bar clamping handle cover into position as illustrated.
  3. Using the supplied key (E), lock the roof cross bar clamping handle cover.
20

Prepare roof cross bar (B).

  • Repeat installation steps 6 to 10 on roof cross bar (B).
21
WARNING
  • This step requires 2 people.

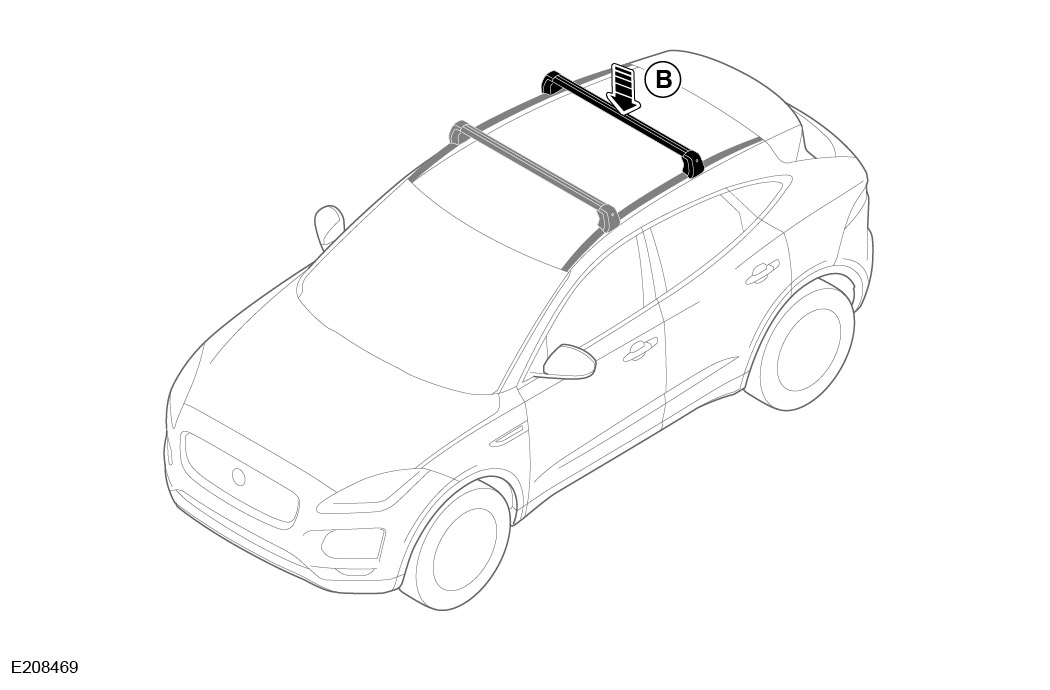
Make sure the orientation of the roof cross bar is correct in relation to the vehicle. Use the label on the left side of the roof cross bar (B) to assist identification. Lift the roof cross bar (B) over the vehicle roof.

  • Repeat installation steps 14 to 19.
REMOVAL INSTRUCTIONS
3

Remove the front roof cross bar (A) first.

4
NOTE
  • Repeat this step for the other side of the roof cross bar.

Move the roof cross bar clamping handle cover on one side of the vehicle.

  1. Using the supplied key (E), unlock the roof cross bar clamping handle cover.
  2. Move the roof cross bar clamping handle cover outwards as illustrated.
  3. Lift the roof cross bar clamping handle cover over the top of the roof cross bar as illustrated.
5
NOTE
  • Repeat this step for the other side of the roof cross bar.

Release the roof cross bar from the roof rail.

  1. Release the clamping handle lock lever by pulling downwards as illustrated.
6

Rotate the clamping handle lock lever upwards to the illustrated position.

7
WARNING
  • This step requires 2 people.
NOTE
  • Repeat this step for the other side of the roof cross bar.

Remove the roof cross bar from the roof rail on one side of the vehicle as illustrated.

8
WARNING
  • This step requires 2 people.

Lift the roof cross bar away from the vehicle roof.

9

Repeat steps 2 to 6 to remove roof cross bar (B) from the roof rails.

10
WARNING
  • After covering the indicated distances, check the torque of all the roof cross bar fixings.

Distances at which torque checks are required.

  • 60 km or 40 miles.
  • 250 km or 150 miles.
  • 1000 km or 600 miles.
11
WARNING
  • Maximum load that can be placed on the roof cross bars is 69.2 kg or 152 lbs.
NOTE
  • The weight of the 2 roof cross bars is 5.8 kg or 13 lbs.

Observe weight limits.

12
WARNING
  • Do not exceed 130 km/h or 80 mph when the roof cross bars are fitted.
  • Do not overload the roof cross bars.
  • Do not load cargo, or accessories, outside of the width of the roof cross bars.
  • Always secure long loads, those significantly exceeding the length of the roof, at the ends of the vehicle.
  • Always spread the load as evenly as possible, on the roof cross bars, with the lowest possible centre of gravity.
  • Do not use elastic straps (bungees) to secure loads onto the roof cross bars.
  • Make sure that all cargo and accessories are fitted securely to the roof cross bars.
  • Always check the security of cargo and accessories after travelling a short distance and thereafter at the indicated intervals.
  • Seek the assistance of another person when fitting the roof cross bars.
  • Seek the assistance of another person when loading and unloading, heavy, or awkward, items to and from the roof cross bars.
  • Adapt your driving technique to suit changes in vehicle handling.
  • Be aware of the extra vehicle height.
  • Negotiate sharp bends with caution and moderate cornering speeds.
  • Avoid harsh acceleration and braking.
  • Be aware of the increased effect of wind on the vehicle when carrying on the roof to minimise the effect of generated lifting and side forces. When carrying multiple surf boards, they should be mounted flat and stacked on top of each other.
CAUTION
  • Do not use automated carwashes with the roof cross bars fitted.
NOTE
  • Removing the roof cross bars, when not in use, will improve fuel economy.
  • Obey local regulations regarding carrying on the roof of a vehicle.

Observe warnings, cautions and notes.