ACCESSORY FITTING INSTRUCTIONS

JAGUAR

I-PACE

REAR MOUNTED BICYCLE CARRIER

T4K1178 T4K1179

FITTING INSTRUCTION

WARNING
  • Accessories which are not correctly installed can be dangerous. Read the instructions carefully prior to installation. Comply with instructions at all times. If in doubt, contact your nearest approved retailer.
Fitting Instruction
1

Assemble the fasteners to the bicycle carrier arm mount and the bicycle carrier.

2

Tighten the bolt using the allen key to secure the bicycle carrier arm mount to the bicycle carrier.

3

Open the bicycle carrier arm clamp.

4

Attach the cycle arm to the bicycle carrier arm mount.

5

Remove the license plate securing clips.

6

Engage the license plate into the mounts on the bicycle carrier.

7

Insert the securing clips to secure the license plate to the bicycle carrier.

8

Release the wheel straps.

  1. Press down on the wheel strap locking switch.
  2. Release the wheel strap through the wheel strap handle.
9

Adjust the extendable bicycle carrier wheel holders to match the size of the bicycle being transported.

10

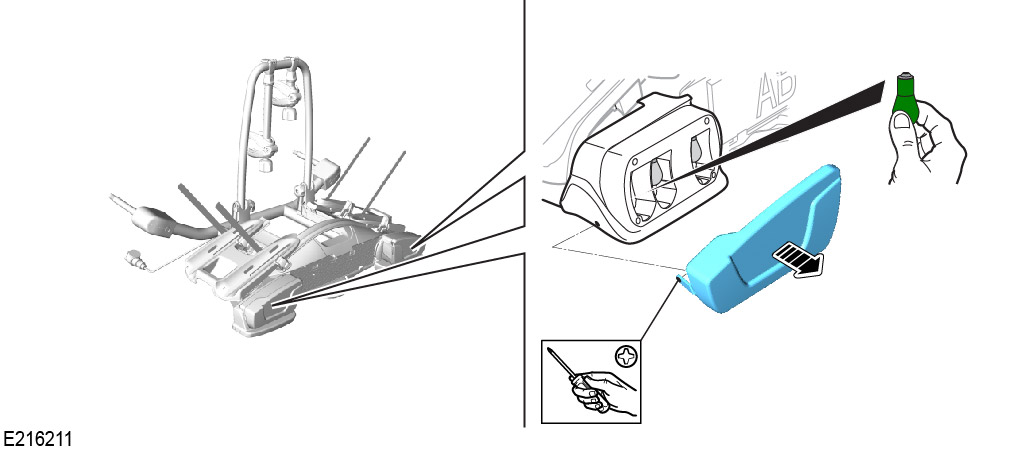
Using the key, unlock the handwheel cover.

11

Slide the handwheel cover rearward (1) and swing the handwheel cover open on the hinges (2).

12
NOTE
  • Store the bumper cover blanking caps in a secure place when the rear mounted bicycle carrier is installed to the vehicle.

Remove the 2 bumper cover blanking caps from the vehicle.

  1. Release the 2 bumper cover blanking caps from the bumper.
  2. Detach the 2 bumper cover blanking caps from the vehicle.
13
NOTE
  • The left side fixing bolt has approximately 5 mm of lateral movement to assist with alignment of the rear mounted bicycle carrier to the vehicle.


14
CAUTION
  • Take care not to damage the rear bumper paint.
NOTE
  • Use a second person to assist with this step.

Align the bicycle carrier to the vehicles securing points.

15

Turn the handwheel anticlockwise to initially tighten the bicycle carrier to the vehicle.

16

Using the tool provided to torque the bicycle carrier fixing bolt to the correct torque.

  1. To torque correctly tighten until the tool gap (1) is closed.
17

Lock the handwheel cover into position.

  1. Turn the key clockwise to the lock position.
  2. Push the cover into position until you hear an audible click.
18
NOTE
  • The reverse lamp on the bicycle carrier tail lamp assembly will not operate on vehicles with 12N/12S type towing electrics using a 7-pin to 13-pin adapter.

Cycle carrier tail lamp assembly.

  1. Engage the electrical connector for the bicycle carrier tail lamp assembly into the connector on the vehicle.
  2. Make sure the bicycle carrier tail lamp assembly is operating correctly.
19
CAUTION
  • If required, rotate the bicycle handlebars by 90° to avoid damage to the vehicle.

If required complete step 15.

20

Lift the bicycle onto the bicycle carrier.

21

Attach the bicycle carrier arm to the frame of the bicycle. Tighten the bicycle carrier arm locking screw.

22

Using the key, lock the bicycle carrier arm.

23

Place the wheel strap over the bicycle wheel and then through the wheel strap handle. Repeatedly lift the wheel strap handle up and down to tighten the wheel strap about the bicycle wheel.

24

Adjust the 2 movable units on the bicycle carrier tail lamp assembly so that each unit is aligned with the tail lamp assembly on the vehicle.

25

Placement of cycles onto the bicycle carrier.

  1. When placing the bicycle onto the bicycle carrier, make sure the heaviest bicycle is nearest the vehicle.
  2. Bicycle should face in the opposite direction to each other.
26

Make sure the bicycle carrier arm is in the upright position when installed to the vehicle.

27
WARNING
  • USA only: the user must change to the red light bulb provided, to comply with the regulations.

To replace a bulb in the bicycle carrier tail lamp assembly, firstly remove the lamp cover and then insert a bulb into the appropriate slot.

28
WARNING
  • Adapt your driving technique to suit changes in vehicle handling.
  • Be aware of the extra vehicle length when the bicycle carrier is mounted.
  • Do not exceed 130 km/h (80 mph).
  • Weight of fully assembled bicycle carrier is 13 kg.
  • Maximum permitted load capacity is 30 kg.
  • Maximum individual bicycle weight is 20 kg.
  • Seek assistance if installing a heavy load.
  • Make sure the load is secure before starting a journey.
  • Check that the bicycle carrier is securely installed after driving a short distance (50 km or 30 miles) and thereafter at regular intervals.
NOTE
  • Keep the instructions in a safe place.

Observe all warnings, cautions and notes.

29

 GB Technical Specification

  • Weight of fully assembled bicycle carrier is 13 kg.
  • Maximum permitted load capacity is 30 kg.
  • Safety instructions for checking before and during travel.
  • The vehicle driver is solely responsible for making sure that the product is in faultless condition and that the bicycle carrier load is securely fastened.
  • Never exceed the permitted towbar arm capacity of the vehicle. The combined weight of the bicycle carrier and the load must never exceed the permitted towbar arm capacity. The information on the vehicles towbar arm capacity can be found in the vehicle information booklet or next to the towbar on a information panel.
  • The maximum weight per cycle is 20 kg. Always position the biggest/heaviest bicycle first and closest to the vehicle and then position the smaller/lighter bicycle.
  • The bicycle carrier shall be assembled and installed securely in accordance with the instructions.
  • Before starting a journey, the function of the tail lamp assembly must be checked. When using the fog lamp on the cycle carrier, make sure the fog lamp on the vehicle is not working at the same time.
  • Before starting a journey, all loose parts must be taken off the bicycles being transported. This could be, for example, child seats, baskets, locks and cycle pumps. The bicycles must not contain loose items that could cause danger to others.
  • If the vehicle is equipped with a power tailgate, this function must be disabled. The luggage compartment must be opened manually when the bicycle carrier is installed to avoid damage to the bicycle carrier and/or vehicle.
  • Check that straps and other fasteners are secure, tighten if necessary.
  • The vehicle's total length increases when the bicycle carrier is attached. The bicycles themselves may increase the vehicle's total width and height. Take care when reversing and/or entering garages or ferries for example.
  • Replace any damaged or worn parts immediately. During use, all levers, bolts or nuts must be tightened (according to instructions). The bicycle carrier arms must always be locked during transport.
  • The bicycle carrier must always be locked during transport. Keep the keys in a safe place.
  • When the bicycle carrier is installed the vehicle's on road behavior may change, especially when taking curves and during braking.
  • Applicable speed limits and other traffic regulations must always be followed.
  • Speed should always be tailored to suit safety considerations with regard to traffic conditions and the load being carried. Maximum speed is 130 km/h (80 mph).
  • The bicycle carrier is constructed to carry standard bike frames. Tandem cycles may not be carried.
  • Jaguar absolves itself of responsibility for any personal injuries or consequential damage to property or wealth caused by incorrect installed or use.
  • Modifications to this product are not permitted.
  • Clean the bicycle carrier regularly using warm water or car shampoo. Make sure the bicycle carrier is cleaned when using at coastal locations (salt water) or during times when salt is used on the roads (winter).
  • For vehicle first type-approved after 1 October 1998, the installed bicycle carrier or the transported goods are not allowed to hide the vehicle's third stop lamp. The vehicle's third stop lamp shall be visible as follows. If these stipulations are not met, a replacement stop lamp shall be installed.
    1. From the left and the right sides as follows: Relative to the vehicle's longitudinal axis at a 10° horizontal angle.
    2. Upwards: Relative to the upper edge of the lamp at a 10° vertical angle.
    3. Downward: Relative to the lower edge of the lamp at a 5° vertical angle.
  • Lubricate the coupling mechanism (not the towbar arm contact area) or other moving parts when required.
  • If projecting more than 40 cm beyond the outer edge of the light emitting surfaces of the clearance or rear lamps of the luggage rack, the load shall be provided, if necessary, to the front with a white lamp at the side not more than 40 cm from its edge and not more than 1.5 metres above the lane. A red lamp shall be visible towards the rear.
  • Check that the bicycle carrier is securely installed after driving a short distance (50 km or 30 miles) and thereafter at regular intervals.
  • When not in use, the product should be removed from the vehicle.
  • Keep the instructions and (if applicable) the type approval (EEC) in the vehicle.