ACCESSORY FITTING INSTRUCTIONS

JAGUAR

I-PACE

BIKE CARRIER HARNESS

T4K1472

FITTING INSTRUCTION

WARNING
  • Accessories which are not correctly installed can be dangerous. Read the instructions carefully prior to installation. Comply with instructions at all times. If in doubt, contact your nearest approved retailer.
CAUTION
  • Make sure the template is printed to scale. Use a ruler to measure the scale bar on the template after it has been printed. The scale bar must be 100 mm long.
NOTE
  • A printer is required to complete this step.
  • Cut along the edge of the printed template as illustrated.
REMOVAL INSTRUCTIONS
1

Open the tailgate.

2

Remove the loadspace floor trim.

3

Remove the left loadspace side trim panel.

For additional information, please refer to the official Workshop Manual. Loadspace Side Trim Panel (501-05)

4

Remove the rear under tray.

  1. Remove the 8 fixings and the 1 fastener.
5
WARNING
  • This step requires the assistance of another person.

Remove the rear bumper.

For additional information, please refer to the official Workshop Manual. Rear Bumper (501-19)

Fitting Instruction
1
WARNING
  • Make sure to wear suitable personal protective equipment.

Mark and cut a hole in the air suspension compressor tray for the bike carrier harness.

  1. Mark the hole position in the air suspension compressor tray.
  2. Cut the hole, for the bike carrier harness, in the air suspension compressor tray using a 32 mm diameter hole cutter.
  3. Remove any cutting waste from the air suspension compressor tray.
2

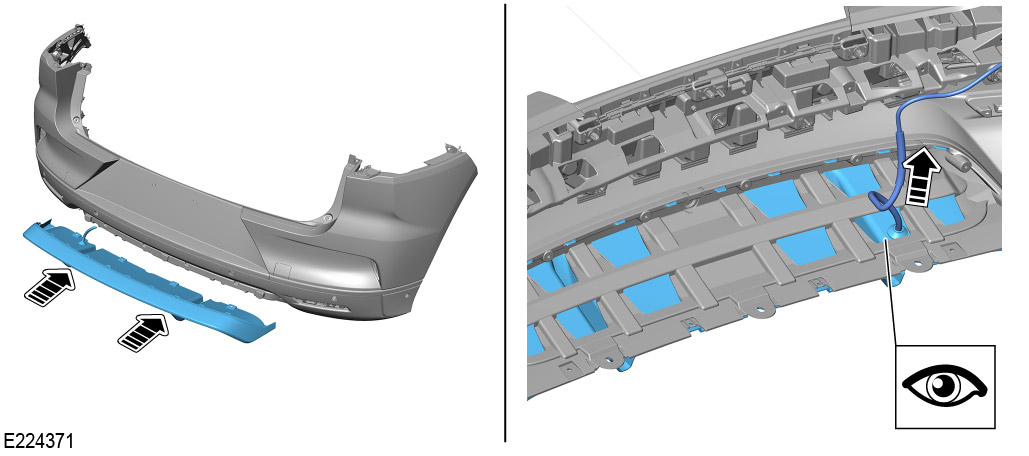
Remove the bumper valance from the rear bumper.

3
NOTE
  • Align the template with the edge of the bumper valance. Make sure the edge of the template matches the cutouts in the bumper valance as arrowed.

Locate and secure the template as illustrated.

4

Mark the 3 hole positions on the bumper valance. Use the template to identify where to mark the hole positions.

5
WARNING
  • Make sure to wear suitable personal protective equipment.

Drill and cut the holes in the bumper valance for the 2 fixings (C) and the bike carrier harness (A).

  1. Drill a 2 mm pilot hole at the location of the 2 fixing holes and the location of the bike carrier harness hole.
  2. Drill the 2 holes in the bumper valance for the fixings (C) using a 5 mm diameter drill bit.
  3. Cut 1 hole in the bumper valance for the bike carrier harness using a 32 mm diameter hole cutter.
  4. Discard the cut out sections.
6

File the edges of the 3 holes.

7

Install the 2 fixings (C) through the 2 holes in the bumper valance.

8
NOTE
  • Applying lubricant to the grommet will help secure the grommet to the bumper valance.

Feed the bike carrier harness (A) through the hole in the bumper valance. The arrowed grommet for the air suspension tray must go through the hole.

  • Secure the bike carrier harness grommet to the bumper valance.
9

Tighten the 2 fixings (C) to the bike carrier harness socket.

  • Torque: 2 Nm
10
NOTE
  • Take care to align and feed the bike carrier harness through the rear bumper as illustrated.

Install the bumper valance, with the bike carrier harness, to the rear bumper.

11
NOTE
  • Take care to support the bumper valance.

Feed a short length of the bike carrier harness through the hole in the air suspension compressor tray.

12
WARNING
  • This step requires the assistance of another person.

Install the rear bumper.

For additional information, please refer to the official Workshop Manual. Rear Bumper (501-19)

13
NOTE
  • Applying lubricant to the grommet will help secure the grommet to the air suspension compressor tray.

Continue feeding the bike carrier harness through the hole in the air suspension compressor tray.

  • Secure the bike carrier harness grommet to the air suspension compressor tray.
14

Secure the bike carrier harness to the vehicle body wiring harness using the 3 cable ties (B) as illustrated.

15

Connect the bike carrier harness connector to the vehicle body wiring harness as illustrated.

16

Install the rear under tray.

17

Install the loadspace side trim.

18

Install the loadspace floor trim.